
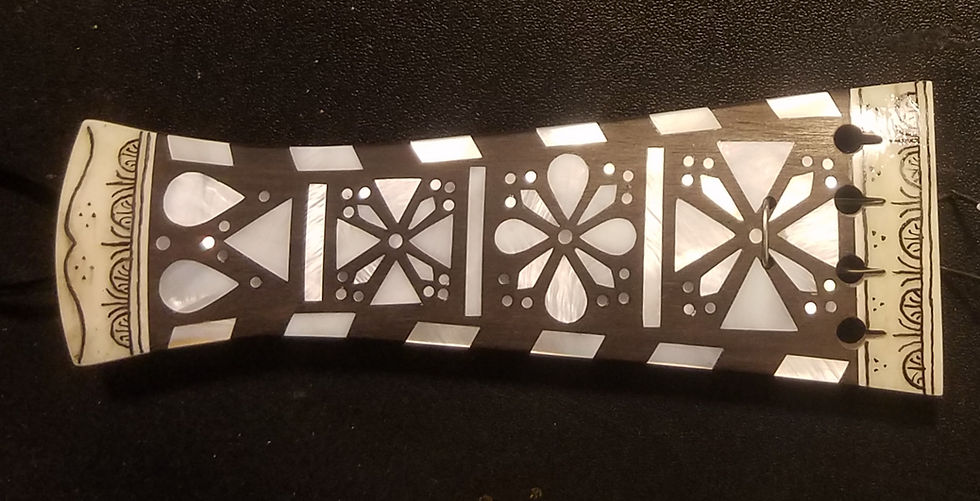
I recently created an inlay design on a music box top for my daughter. My previous inlays have either been really small, such as on ornaments, or geometric, such as on my first Hardanger fiddle fingerboard.
Typically, I would make a drawing, cut out the inlay piece, then temporarily glue the piece on the wood substrate so I could make a mark around the piece, fill it with white chalk or powder, and finally route out the inlay groove. This was an effective way to get exact outlines for the inlay groove based on the actual piece that I cut out.
However, as soon as I had cut out all of the pieces for this inlay, I realized this old process would be a tedious task. Not only did I have well over a hundred pieces to do this for (not including the geometric border design), but I also realized that I'd run into issues fitting a scribing knife or pencil between some of the pieces. Not to mention the logistics of getting the composition and spacing right.

The simplest solution would be to take a print of the original design and simply route out the grooves based on that. The only issue is that I treated the design as a suggestion, not a rigorous template, so my cut pieces didn't match it exactly. Just as I was regretting this and buckling down to try and scribe the parts one at a time, I had an idea! Here's what I came up with:
1. Take a piece of wax paper and overlay it on your original design. Glue each piece over its corresponding part with a glue stick (this is enough to hold it down but not so sticky that adjustments can't be made later on). Hint: if you glue each piece as it's cut, it's a good way of keeping track of your progress, and doesn't require sorting through or labeling lots of little pieces later on!

2. Take the wax paper with all the pieces and overlay it on your final substrate. Make any aesthetic adjustments as you consider wood grain, spacing, etc.

3. Here's the clever part: take a scan of your inlay on a computer scanner. Be sure the contrast shows the edges clearly, and that the sizing is 100% or 1:1. Hint: some pieces, especially of white pearl, may not show up with much contrast. Take a pencil and rub the edges of these pieces, and then the edges will show up crisp and clear in the scan.

4. With the scan attached to the inlay substrate, you can directly route out the grooves. No scribing, no labeling tiny pieces, no risk of losing the pieces or jumbling them up, and an exact outline matching the precise piece you cut out!

The final result is a beautiful, custom inlay, cutting out many redundant steps in the process. While I greatly appreciated the flexibility that this gave me in being spontaneous with my cuts and still getting exact recesses cut for the shells, this could be avoided by strictly adhering to the original drawing. However, what I liked most about this method is that I didn't have to label each little piece of shell and then try to keep track of hundreds of small shells, inevitably losing a few. Instead, gluing cut shells onto wax paper was a convenient way of keeping track of so many pieces. Overall, this has been my favorite method for consistency in inlays with all the various methods I've tried!

Comments